Tuesday, June 28, 2011

More Zulu War British Infantry


As mentioned the other day… I had a FEW british units on the go and nearly finished, so here then, is the other one…

(Remember: click on the pictures for a bigger version)


The figures are from Wargames Foundry. With the yellow facings and black ammuniton pouches these were meant to be the 99th Foot (Lanarkshire) which marched with the No.1 Column under Col. Pearson and fought at the battle of Nyezane and were ultimately besieged at Eshowe. Later they formed part of the 1st Brigade in the second invasion of Zululand.

The 80th Foot also had yellow facings… I may try to pass these off as them at some point as well. I don’t know about the 80th’s ammunition pouches.


Another odd officer from the surplus Foundry pack of goofy cartoony command types…

Coming soon on Tim’s Miniature Wargaming Blog:

I now have three units of British infantry (two line, one rilfe), the gatling gun and a 7 –pdr gun… time to get cracking on some ZULUS!!!

…of course if I DID do one more unit of British (maybe the HIGHLANDERS!?) I could form a nice neat four battalion square?!

Aye-yi-yi?!

Monday, June 27, 2011

3rd Battalion 60th Rifles


Oooohh… up waaaaay toooo late finishing these guys off…. There must be a better way to get things done!? Anyway, the remainder of the Rifles…

(Remember: click on the pictures for a bigger version)


These figures are from Old Glory. As I mentioned yesterday, these aren’t specifically “rifles” – they’re line infantry that I’ve painted as rilfes. The main difference is the Rifles would have been armed with a sword bayonet.


Officer and Sergeant from Eureka Miniatures. Like the Sergeant Major yesterday, these chaps aren’t really “on strength” with any of the units I’ve organized.

Now, those of your who are actually paying attention and reading this rubbish I type along with the pretty pictures (if you don’t – not to worry – I rarely read the text of any of the blogs I follow… bring on the pretty pictures!!) you might wonder; “well dumbass, why didn’t you paint them rifle green and make THEM the officers for this unit of rifles you were complaining about not having officers for yesterday….!?”

Here’s why:


They’re HUGE!

Here they are next to a couple officers and sergeants from Other companies:


Sergeants from Black Tree Design, Eureka, Foundry and Foundry


Officers from Foundry, Eureka, Black Tree Design, and Foundry

(bonus points for anyone who can guess the ribbons the Eureka sergeant is wearing!)

Coming soon on Tim’s Miniature Wargaming Blog:

Probably more British – in Red coats! Then Zulus… Martians… etc..

Sunday, June 26, 2011

Sergeant Major – Rifleman – Gladiator


Just a couple new ones…

(Remember: click on the pictures for a bigger version)


An odd Sergeant Major from Wargames Foundry that doesn’t currently belong to any particular unit… Oh, I painted him with green facings, so he’s ostensibly from the 24th (South Wales Borderers)… but I have all my units organized into units of 15 men of like manufacture… and this chap isn’t currently on strength with any of them…


A Riflemen from Old Glory. The figure is realy just a line infantryman I’ve painted in the colours of the Rifles… I think the only real (distinguishable) difference would be that he should have a sword bayonet… But, honestly, if I hadn’t just told you… how many would have known… I’m not sure there’s actually anyone out there that specifically MAKES riflemen for this conflict (with Sword bayonets), so…

I have two British units on the go – The rifles and another line regiment. Both are about half done – yesterday I realized I wasn’t going to be able to finish up either so I finished off this sole rifleman just to see what they’d look like. The rest of the unit shall follow shortly.

On the plus side; old glory supplies their units in bags of 30. This is really handy for me because as I mentioned, I am organizing my forces into units of 15. Within certain bags of certain units types of certain ranges – usually ones you wouldn’t be fielding multiple units of - they include some sort of command. Usually this includes two officers/musicians/standard bearers – if it’s of an era that would have such things – this is even MORE awesome – again because of my current organization I get two complete units – command and all…!? Unfortunately, I’m guessing they assume for the Zulu War, one would be wanting a whole lot of British regulars so the command stuff is sold in a separate bag… so from this bag I will have two units of 15… with no officer… At some point I’d like to track down and officer for the two units (though from a different line - I won’t be buying another whole bag of OG stuff… just to get a couple officers!?)… but then I end up with two extra dudes... You might think – “what’s the big deal?” but the drawers I store these in fit neat lines of 10 figures – thus making units of 15 take up exactly one and a half rows… yeah… I’m that A-R about these things…

Sigh…


..and another Gladiator for my own team. The figure is from Black Tree Design. I’ve read some disparaging things about BTDs service, and indeed a year or so ago my firend Gary ordered some stuff from them and I think it took more than three.. maybe even four or five months to get all his stuff… But I’ve ordered a number of things from them (the USA supplier) this year (starting off with very small orders to fill in some gaps in units I’d picked up off ebay) and have had no trouble at all. A couple times things have been back-ordered – but they’ve followed along a couple weeks later…

Our Savage Saturday Gladiator Campaign had been raging on for a couple weeks (two weeks “real world time”, four weeks of “campaign time”). I have yet to field any of my own team members (too busy running the show)… perhaps next week….

Coming soon on Tim’s Miniature Wargaming Blog:

The Rifles!! Then probably a line regiment… Then Zulus or Martians!!

Friday, June 24, 2011

The Guns


Some artillery support for my British Imperial/colonial forces

(Remember: click on the pictures for a bigger version)


Royal Artillery 7 pounder from Black Tree Design.


Martian Colonial Field Artillery. The crew are from RAFM. The carriage is of unknown origin – I got it in a trade (without the actual gun barrels). The gun barrel is a spare from a Renegade Miniatures British Napoleonic artillery pack (the packs are supplied with THREE different barrels!?)

Coming soon on Tim’s Miniature Wargaming Blog:

Hmmmm… Zulus? British? Martians…? Hard to say – the workbench is mighty cluttered with all three at the moment (along with a few more gladiators!)

Tuesday, June 21, 2011

Royal Artillery Gatling Gun

…for a little rat-at-tat-tat!

Actually the sound effect would probably be more like “Chunk-chunk-chunk-chunk… Oooh boogger, she’s jammed!” … or something like that…

(Remember: click on the pictures for a bigger version)


This gun and crew is from Black Tree Design.

Nice to paint two guys and a gun and be able to say “Another unit: Done!”

Of course now I have to paint another two units of Zulus just to even the odds again…

Coming soon on Tim’s Miniature Wargaming Blog:

Zulus… more maybe more British stuff… or Martians…

Probably British – it seems to have worked it’s way to the front of the workbench.

The plus side of the postal workers lock out (which otherwise is a sad situation all round!) is that the last couple orders currently inbound will be delayed and therefore unable to distract me from my current purpose!

Zulu War – Sword and the Flame

My friend Will was in town this past weekend and on Saturday we played a little game of The Sword and the Flame. For those of you who are unaware, TSATF is a set of rules for the wars of British imperialism that’s been around for, like, ever… and I’ve wanted to play it for nearly that long… but somehow never did. Anyhow, Will was kind enough to take me though a quick little game with some of my Zulu forces.

Zululand, March 1879

SCENARIO

Go get ‘em! The British have to go out and find the Zulus that are sneakily hiding in the grass somewhere.

FORCES

The British

Major Smythe-Brown - C-in-C
1 company British Infantry (15) Rifle
1 troop British Mounted Infantry (11) Carbine

The Zulus

lWil kaBallii - C-in-C
3 warbands Zulus Warriors (15-16 ea)
2 units Zulu Skirmishers (10 ea)


THE GAME

(Remember: click on the pictures for a bigger version)


Will’s fancy action deck.


The British Forces enter the lands of lWil kaBallii… Where could those dastardly Zulus be hiding.


The Infantry wheeled to the right in open order to go try and flush out the tall grass, while the mounted infantry peeled right and sent out outriders to scout ahead and to the sides.


The British infantry came under fire from Zulus concealed on a rocky outcrop.


The British wheeled around to bring fire to bear on the sniping Zulus – their fire was surprisingly devastating!?


In a turn or two of firing half the Zulus were dead or wounded!


Meanwhile, the one of the scouting/outrider parties of the mounted infantry started taking long range fire from another group of Zulus concealed on an outcropping.


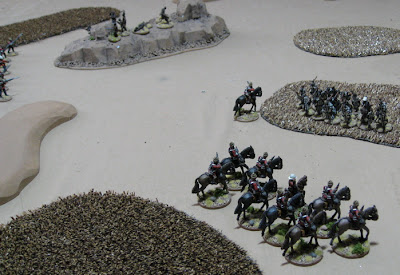
As the mounted infantry advanced under fire the other group of outriders stumbled upon a great band of Zulus concealed in the tall grass nearby…


The Zulus charged the mounted infantry before they could gallop off!


A few Zulus were wounded by fire as they charged in, thining their ranks some, but not enough to ward them off.


On their way in the Zulus chucked spears causing some disruption and injuries.


The actual close combat was a rather lengthy and brutal affair….


I think some three separate rounds of combat were fought…


Before the shattered remains of the mounted infantry gave up and galloped off.


The rest of the Zulus appeared from their hiding places and advanced on the British infantry.


The Zulus move in.

The British mounted infantry did try to regroup, bringing in the outriders. Eventually, however, they failed morale and retired from the table.


Advancing under cover from the British infantryman’s deadly fire.


USUTHU!! In they go!


Again the British fire was withering. A few Infantrymen were lost to thrown spears.


In the melee a few more British were lost but the first charge of the Zulus was driven off.


The next nearest unit (which had been previously mauled in their attack on the mounted infantry) failed morale and scarpered.


The remaining Zulus made a headlong charge, leaving a few stragglers behind.


Again a few rounds of close combat were fought and they were brutal and bloody.


Fought nearly to the last man….


The Zulus overcame the British, but it was pyrrhic victory. The British had sold themselves dearly!

So… The Sword and the Flame….

Definitely a fun game. Thanks to Will for running the game for me!

The game seems somewhat limited in its scope, but could easily be adaptabled for other conflicts. In a much bigger game I could see it sort of bogging down – the whole drawing to determine the extent of injuries – unless one was playing a campaign why would you need to determine whether troops were wounded or dead…? Also the close combat, which was much like Contemptible Little Armies (in that it was fought figure to figure), I imagine could bog down with larger numbers of figures and units.

As will left his copy with me, I’ll probably give it another go. Perhaps I’ll end up incorporating some of the mechanisms (I know John would like the whole testing to see if you go into melee…) into the Ever (Modified) Victorious Armies… or whatever we end up playing…

Coming soon on Tim’s Miniature Wargaming Blog:

I'm just finishing up a Gatling Gun and crew for the British. After that...? More Zulus (or British… or Martians...) and perhaps a few more GLADIATORS!!?

Speaking of Gladiators... If you haven't checked it out already our Gladiator campaign has started - you can check out the action over at Savage Timmy's Playhouse

Sunday, June 19, 2011

Descent Minis for John


Just couldn’t get a decent picture of these…

(Remember: click on the pictures for a bigger version)


These are a few Descent miniatures for John. He’s apparently started a new campaign. I have not played it…

Coming soon on Tim’s Miniature Wargaming Blog:

Zulu War action using Sword and the Flame! (hopefully get that game report finished up tonight!)

More Gladiators!

More Zulus, British, and Maritans!

Friday, June 17, 2011

Still More Gladiators


A few more for the arena…

(Remember: click on the pictures for a bigger version)


A few brutes from Crusader Miniatures. These are currently free agents, not claimed for any of the players teams in our Savage Saturday Gladiator Campaign.


A couple more for Amanda’s team from West Wind Productions or Old Glory?

The action begins tomorrow – check it out over at Savage Timmy’s Playhouse. (I’ll probably get to posting the after action reports on Sunday…

Coming soon on Tim’s Miniature Wargaming Blog:

Same as always… Gladiators… Zulus… British… (John’s Descent figures… ) and hopefully an after action report of some more Colonial EVA!

Thursday, June 16, 2011

More for the Arena


A couple more for our upcoming Savage Saturday Gladiator Campaign (action starts this Saturday)

(Remember: click on the pictures for a bigger version)


Most of these are from Crusader Miniatures, except the guy in the black mask who, I think, is from Wargames Foundry .

The gladiator is for my “team” – I’ve chosen to do them all with white loincloths and reddish shields. The guy with the mask is some sort of arena official. The other two I’m going to use as “motivators”. I’m not sure what they did historically, but if players aren’t closing I’m going to have them out there to start shooting arrows/chucking javelins at them – because I can see situations where we might have two guys with “first strike” (an edge that gives the character a free close combat attack against one opponent that moves into contact with them per round) not wanting to close with one another because… well… they’d give up that free attack. Also if people are spending to much time talking sh!t to each other (taunting and intimidating – tests of will - in an attempt to gain some edge over their opponent).

Coming soon on Tim’s Miniature Wargaming Blog:

Same as always… Gladiators… Zulus… British… (John’s Descent figures... maybe I better finish them off tonight… )

Tuesday, June 14, 2011

More Gladiators


I finished up a few more Gladiators last night for our Savage Saturday Gladiator Campaign.

(Remember: click on the pictures for a bigger version)


This is Jolo’s team. The figures are all from Crusader Miniatures. The one on the right I finished (and posted pictures of) yesterday. But since I finished the rest of the team last night I thought I’d throw him in for the group photo!


A couple arena officials/trainers, also from Crusader Miniatures.


A Gladiator for my team (also from Crusader Miniatures).

Coming soon on Tim’s Miniature Wargaming Blog:

Probably a few more gladiators… then back to Zulus and British (and maybe some Martians!).

Monday, June 13, 2011

Those About to Die

Or already dying…

Over the weekend I finished up the last of the Zulu War British dead and started in on some Gladiators and extras for my Savage Saturday Gladiator Campaign

(Remember: click on the pictures for a bigger version)


A Pair of Gladiators – one for my team, one for Jolo’s. John’s, on the right, is from Crusader Miniatures, and the one on the left is from Black Tree Design

I also picked up some extras – officials, Roman citizens, trainers, condemned…


These are four condemned men and a Roman citizen, all from Crusader Miniatures.


Finally the Zulu War British Dead. These are all from Old Glory. I’ve painted a pair of each of the Highlanders and Rifles. Now to paint some Rifle and Highalnd units!?

Coming soon on Tim’s Miniature Wargaming Blog:

More Gladiators, Zulus, British, etc…

Saturday, June 11, 2011

Zulu Attack at Braun’s Drift


Another Battle over another ford. I now have a third unit of Zulu warriors, so it’s time for the Zulus to take the offensive!

We were also trying out a few more tweaks to the rules… mostly concerning movement distances and special rules concerning the movement of mounted troops.

Braun’s Drift, March 1879

SITUATION

After the debacle of the first invasion Lord Chelmsford is biding his time waiting for reinforcements to arrive so he can launch a second invasion into Zululand. In the meantime raids and patrols are being sent across the border to harass the Zulus and scout potential invasion routes.

A company infantry is stationed at Braun’s Drift along with a troop of mounted infantry. Nearby is a staging area for supplies to be moved north. Just across the Thukela river in Zululand is the Kraal of the feared Zulu cheiftan; mTi kaRbonw.


SCENARIO

The British must prevent the Zulus from crossing the river. The Zulus must attempt to cross the river. The River is only crossable at the ford/drift.

FORCES

The British

Major Burton-Linny - C-in-C
1 company British Infantry (15) Breach Loading Rifle
1 troop British Mounted Infantry (10) Breach Loading Carbine

The Zulus

mTi kaRbonwe - C-in-C
3 warbands Zulus Warriors (15-16 ea) Ferocious
2 units Zulu Skirmishers (10 ea) Rifled Musket, Skirmishers


THE GAME

John decided to play the British and I (along with a special helper) played the Zulus.

(Remember: click on the pictures for a bigger version)


Braun’s Drift with the British encampment on the Natal side of the Thukela River.


Another shot of the British and their camp on the Natal side of the river.


John set up his British infantry on the Natal side of the river and his mounted infantry across the river – from the start the mounted infantry galloped off to the flank to harass the advancing Zulus.


The Zulus advance.

In the background can be seen my dice rolling assistant who was exceedingly happy to get to stay up past his regular bedtime to play games with his dad’s friends and toys! He takes defeat a little hard and after the first volley from the British wanted to switch sides and roll dice for John… He was, however, convinced to stick it out with the Zulus!


That aforementioned first volley from the British – devastating! Almost half the Zulu unit was knocked out!


One unit of Zulus peeled off to try and deal with the mounted infantry. The British stuck around for one turn and tried to shoot up the approaching Zulus – The tall grass apparently offered better concealment that we imagined as only minor casualties were sustained…


The Junior Subaltern discussing the finer points of Zulu War Tactics with his rival…


The second volley from the British infantry at the drift did that first unit of Zulus in.. all but one were lost – the remaining one failed a number of morale tests and scarpered. The Skirmsihing Zulus with muskets were in position however and started pinking away at the British themselves.


The sniping from the Zulus with muskets compelled the British to retire from the ford – but they kept up their fire knocking off a number of the Zulus in the next unit that were about to cross the drift.


The mounted infantry decided to try and close with the skirmishing Zulus. Later we realized that they technically shouldn’t have been able to… but I may change that rule – I think rather than simply arbitrarily stating that they cannot do so – simply make it so there is really no benefit for them to do so… Anyway, they lost two in the charge in and the fight wasn’t very conclusive both sides lost d6-2 – unfortunately Zulus lost FOUR(!) and the British NONE! The Zulus failed a morale test and were obliged to retire back to the cover of the tall grass.


The Zulus finally rush the British!


Another view of things around the same time.


The Zulus lost SIX(!) to closing fire as they rushed in, but the shock and violence of the ferocious Zulus unsettled the British who lost five of their own in close combat and were required to retire the next turn.


The same unit moved in and again pressed the British back. There were more British losses and they were required to retire into the woods behind them!


On the final turn the third unit of Zulus passed through to press the attack! They darn near whipped out the British and at that point John conceded the game. I can’t remember if we bothered to roll for morale for the British that turn to see if they would have broke…?

The mounted infantry made it back across the river and galloped away back to the staging area to warn of the Zulus approach!

We had tweaked some movement rates from the last game and were trying out some new rules concerning the movement of mounted troops – which I think worked out well enough with rational players… we’ll see how well they work with (or how they can be abused by) rules lawyers – I’m just not clever enough to foresee these sorts of things.

I think I might also adjust the ranges of the firearms slightly…

John seems to think I need to paint more British. I think I’ll get to work on some artillery… or maybe the Gatling Gun… just to try something new. I think I’ll also work on some earthworkd to give the British something else to defend.

What I really need is a shedload of wagons and oxen to make a lager to defend!

Coming soon on Tim’s Miniature Wargaming Blog:

More Zulus (or British… or Martians) and GLADIATORS!!?